
Introduction
Has the power of ChatGPT led you to explore large language models (LLMs) and want to build a ChatGPT-like chatbot app? Do you want to create a chatbot with your own personal touch? Do you want to deploy a chatbot tool for your team at work to support daily tasks? This post shows you how to build a chatbot for free (that is, if you already have a GPU 🤭) to make experimentation easier while offering functionality roughly similar to ChatGPT (this depends on your hardware resources 🫢). Let’s go
Running LLMs with Ollama
Running large language models (LLMs) on a local server can be very useful when you already have compute resources available, whether you want to experiment or build more powerful applications with them. However, configuring the working environment and running LLMs on your machine is not straightforward due to various optimization concerns. With Ollama, you can easily run the Llama 3.1 model (q4_0 quantization) with a GPU of around 8 GB VRAM.
So how do you quickly run LLMs on a local server? Enter Ollama, a platform that makes local development with open‑source large language models simple. With Ollama, everything you need to run an LLM is the model weights, and all configurations are packaged into a single Modelfile. Think of it like Docker for LLMs. In this section, we’ll look at how to get started with Ollama to run LLMs on a local server. This guide is based on Ubuntu. For Windows or macOS, check the Ollama and Open WebUI docs — they’re quite approachable as well.
Install Ollama
First, install Ollama. It supports all major platforms: macOS, Windows, and Linux.
To install Ollama, visit the GitHub repo and follow the instructions, or go to the official Ollama website. On Ubuntu, run:
curl -fsSL https://ollama.com/install.sh | shThe installation usually takes a few minutes. During the process, NVIDIA/AMD GPU drivers will be auto‑detected (make sure you’ve installed the drivers). Ollama can also run on CPU if you don’t have a suitable GPU (but let’s be honest, no one wants a chatbot that takes minutes to reply to a simple message 🙃).
How to run Ollama
After installation, Ollama installs a background service that exposes a local API on port 11434. On Linux, the service starts automatically, but it’s good to know the manual commands:
# start the service
ollama serve

# or manage it via systemd
sudo systemctl start ollama
sudo systemctl status ollama
On macOS or Windows, Ollama runs from the tray app; quit and relaunch it to restart the service. If you prefer running it ad-hoc, stop the service (sudo systemctl stop ollama) and launch it only when needed with ollama serve in a terminal session. Once the service is up, the API is reachable at http://localhost:11434 for the CLI, Python SDK, or any other client like Open WebUI.
Pull a model and run
Next, browse the Ollama model library to see all currently supported model families (at the time of writing, Ollama supports up to Llama 3.2 1B and 3B; the 11B and 90B vision variants aren’t supported yet). The default model pulled is the one tagged latest (starting to feel like Docker, right? 🤗). On each model page, you can find more information such as size and the quantization method used. Quantization, simply put, trims the decimal precision of each parameter to reduce memory usage at the cost of some accuracy (we won’t go deep into this here). Full precision is typically 32‑bit floats (FP32). From my experience, Ollama’s default models are often quantized to 4‑bit and still handle common tasks like coding or reading comprehension well.
In the library, you can view model variants and parameter counts to choose what fits your needs.
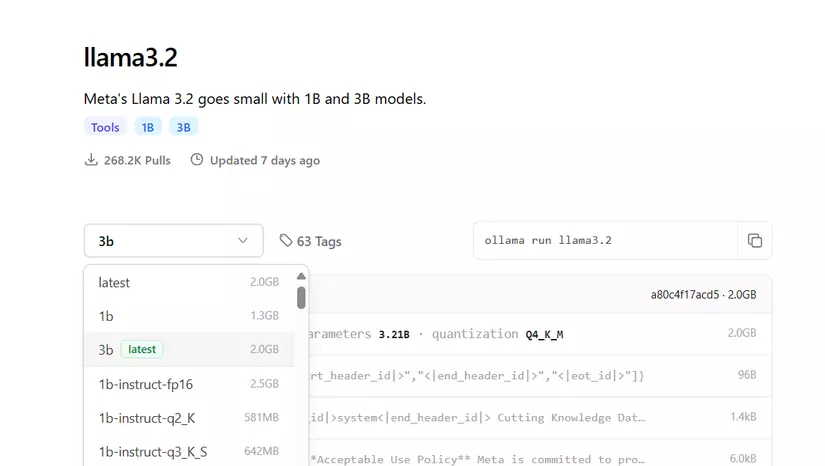
Ollama model library
You can run a model with the ollama run command to download it and start interacting immediately. You can also pull the model first and then run it — similar to how you’d work with Docker images.
For example, to download Llama 3.1, run:
ollama pull llama3.1Or just run directly:
ollama run llama3.1If the model isn’t present, Ollama will pull it automatically. After running, you can chat with the model right in the terminal (to exit, type /bye or press Ctrl+D).
Customize the model
As with Docker, you can customize a model by writing a Modelfile. For example, to add a system prompt, see the following sample:
FROM llama3.1:latest

SYSTEM """
You are a virtual assistant developed by the AI Team of TonAI Company
Your name is 'TonAI Lạc Đà' (Llama is Lạc đà in Vietnamese) because your base model is Llama 3.1 8B
"""
You can also tweak model parameters such as temperature, num_ctx, and more. For a detailed guide on writing a Modelfile, check this link or search on Ollama Hub, where people share their models.
To create a new model, run:
ollama create TonAI:chatbot_mini -f ./ModelfileHere, TonAI:chatbot_mini is the name of the model (if you don’t specify a tag after :, it defaults to latest, just like Docker) and -f points to the Modelfile path.
After creating the model, run it for a quick test:
ollama run TonAI:chatbot_miniAnd here’s an example of the result:
>>> Hi
Xin chào! (Hello!) How can I assist you today? Is there something specific on your mind, or would you like to have a chat?

>>> Who are you
I am TonAI Lạc Đà, a virtual assistant developed by the AI Team of TonAI Company. My base model is based on Llama 3.1 8B, which allows me to understand and respond to a wide
range of questions and topics.

I'm here to help answer your questions, provide information, offer suggestions, and even just have a friendly conversation if you'd like!

>>> Send a message (/? for help)
Use Ollama with Python
You can also use Ollama from Python. Install the Python package via pip:
$ pip install ollamaHere’s a minimal example using Ollama with Python:
import ollama

while True:
    message = input("User: ")
    response = ollama.chat(model='TonAI:chatbot_mini', messages=[
        {
            'role': 'user',
            'content': message,
        },
    ])
    print(f"Ollama: {response['message']['content']}")
Open WebUI
After installing Ollama, you’ll likely want an interface to use it more easily. In this post, we’ll use Open WebUI to spin up a ChatGPT‑like web interface.
Open WebUI is an extensible, feature-rich, and user-friendly self-hosted WebUI designed to operate entirely offline. It supports various LLM runners, including Ollama and OpenAI-compatible APIs.
You can install Open WebUI using Docker, PyPI, or from source — see the code at here.
Installation
With Docker
If you’re using a GPU, run:
$ docker run -d -p 3000:8080 --gpus=all -v ollama:/root/.ollama -v open-webui:/app/backend/data --name open-webui --restart always ghcr.io/open-webui/open-webui:ollamaIf you’re using CPU only:
$ docker run -d -p 3000:8080 -v ollama:/root/.ollama -v open-webui:/app/backend/data --name open-webui --restart always ghcr.io/open-webui/open-webui:ollamaAfter installation, access Open WebUI at http://localhost:3000.
With Python (pip)
Install Open WebUI with:
$ pip install open-webuiThen run Open WebUI:
$ open-webui serveAfter installation, access Open WebUI at http://localhost:8080.
From source
This approach is useful if you want to customize the UI. First, clone the source code:
$ git clone https://github.com/open-webui/open-webui.gitInside the backend directory, there’s a start.sh script you can run (you can customize the port and hostname there):
$ cd open-webui/backend
$ bash start.sh
To avoid the app stopping when you close the terminal, consider using Tmux to keep it running continuously.
Time to try it 😎
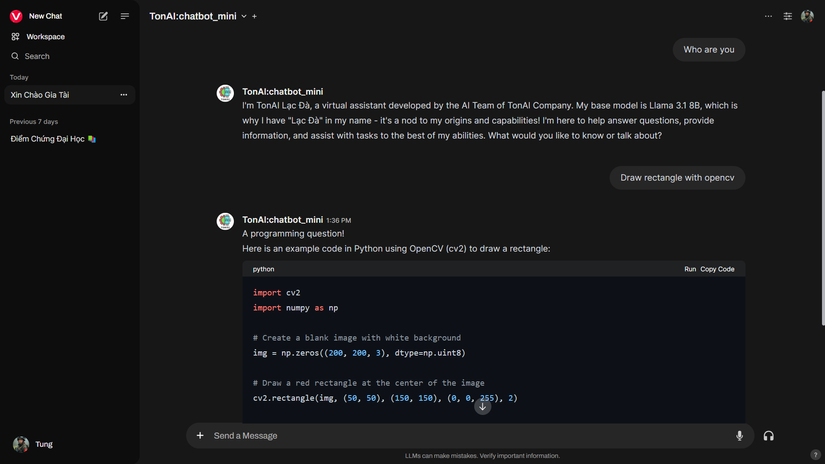
Customize the model’s responses to your liking
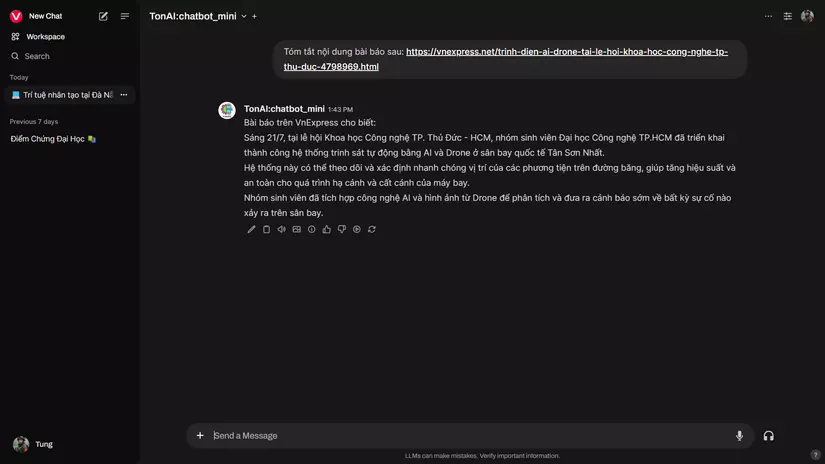
Ollama can access links and documents to read
Ollama can access links and documents to read. With certain vision models, it can also understand image inputs. The Open WebUI interface offers plenty of features such as model management, user management (if you’re an admin), database management, and more. There are also advanced features like connecting to image generators such as ComfyUI or A1111.
This has been a brief guide to quickly spinning up a chatbot to experiment with large language models. I hope it’s useful for your projects. I’ll try to research and publish more in‑depth posts on Generative AI in the future 😊